
How to Build a Youth Centre That Young People Actually Want to Use
- ANOOP RANDERWALA
- Mar 16
- 5 min read
Updated: Mar 17
Creating a youth centre is not simply about filling a room with furniture, bright colours and activities. The most successful youth centre design starts long before any paint touches the wall. It begins with understanding how young people move, think, interact and feel inside a space. A well-designed youth environment can influence behaviour, improve engagement, encourage conversation and create a stronger sense of belonging
For any organisation planning a youth centre refurbishment, youth space design, or community youth hub project, the process must begin with one thing: the site visit.
Start with the Space Before the Ideas
Before any creative thinking begins, every youth centre needs a full site assessment.
This means measuring walls, ceiling heights, floor areas and identifying practical details such as plug sockets, exits, electrical points and potential hazards. But measurements alone are not enough.


You also need to understand the natural flow of the building:
Where do young people enter?
Where do they naturally gather?
Where do they sit and talk?
Is the pool table in the right place?
Are there hidden corners for one-to-one conversations?
Are there dead spaces that currently serve no purpose?
This early stage often determines whether a youth centre becomes functional or frustrating later on.
Build the Vision Before Consultation Starts
Once measurements are complete, the next stage is creating 3D plans and visual mood boards.


This is where ideas begin to take shape.
A mood board is essential because young people often struggle to visualise ideas from conversation alone. Without something visual, consultation can become slow, chaotic and difficult to hold attention.
Mood boards help young people:
react quickly
recognise styles they like
compare themes
become excited about possibilities
This is not about giving them a finished answer. It is about giving their imagination a direction. Retail references often help here because young people instantly connect with spaces they already admire brands, shops, sports environments, music venues and gaming culture all become useful inspiration.
Consultation Must Go Beyond Asking “What Colour Do You Want?”
The strongest youth participation design projects involve proper structured consultation.
That means involving:
young people of different ages
different personalities
different genders
youth workers who understand the group dynamic
Before brainstorming starts, explain clearly:
who you are
why you are there
what the project aims to achieve
A useful step is speaking with youth workers beforehand to understand the social dynamics:
Who has the loudest voice?
Who influences others?
Who has strong ideas but stays quiet?
Who needs encouragement to speak?
This helps avoid only hearing from the most dominant personalities.


Work Through Every Room Separately
Each room should be treated as its own environment.
Ask practical and emotional questions:
What should happen in this room?
Should it feel calm, energetic, inspiring or social?
Is there a theme?
What brands feel exciting?
What spaces do they enjoy visiting outside school?
Which people inspire them?
Furniture should also be divided into:
hard furniture
soft furniture
Because comfort, durability and purpose all matter differently.
Show Them What They Are Getting
After consultation, ideas should be turned into a clear visual proposal.
This means producing:
3D visuals
graphic placements
wallpaper concepts
furniture layouts
art installation ideas

If young people mention a sports figure, artist or cultural influence, place that visually into the concept. Seeing their ideas brought to life builds immediate buy-in.
At this stage, include a clear list of requested hard items:
TV
games console
seating
storage
tables
This becomes final sign-off before production begins.
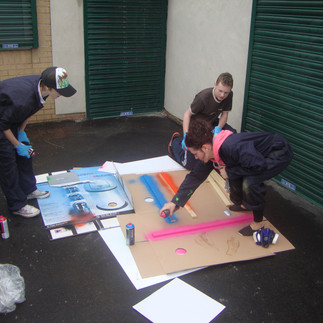
Let Young People Help Build It
One of the most powerful stages is participation.
Whenever possible, involve young people in:
painting
applying graphics
helping build furniture
assembling elements
Ownership changes behaviour.
A space they helped create is a space they respect more.


Safety, Durability and Regulations Matter More Than Style
A youth centre must still perform under heavy daily use.
That means:
all furniture must be commercial grade
materials must meet fire regulations
wiring must avoid trip hazards
high-value items must be secured
For example, consoles often require secure anti-theft boxes.
Even practical items can be softened visually by adding graphics or custom stickers so they do not feel overly institutional.
Avoid domestic furniture that will quickly fail under youth-centre use.
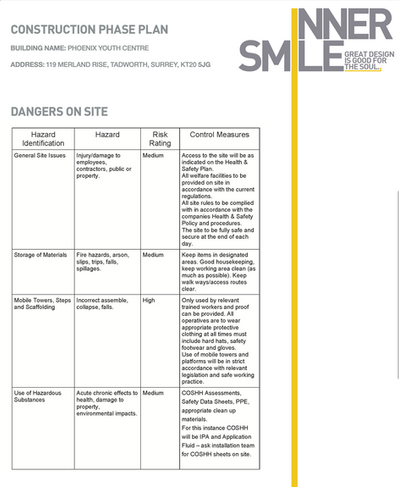
Installation Needs a Proper Project Plan
Before fitting starts, youth workers need a practical installation plan:
van access
fitting hours
rubbish removal
cleaners
furniture removal
room closure schedule
health & safety docs
This avoids disruption and delays.


Turning Approved Ideas Into Print-Ready Artwork
Once the final concept has been approved by the youth centre, the next stage is preparing the artwork for production.
At this point, every wall graphic, wallpaper panel and installation element must be translated into a precise artwork specification for print.
This is where creative thinking becomes technical delivery.
The artwork spec acts as a blueprint for the printer, ensuring nothing is guessed on site.
This avoids expensive mistakes and ensures every printed panel fits exactly as planned.

Creating an Installation Programme So Everyone Knows What Happens on Fit Day
Once artwork is approved and sent to print, the next stage is producing a full installation programme. This document is shared with both the youth worker and the fitting team so everyone understands exactly what is being installed, where it is going, and on which day each room will be completed. The installation programme removes uncertainty.
This means the fitters arrive knowing precisely which walls they are working on first, while youth workers can manage room closures, staff movement and access around the programme.
Because youth centres are live working environments, planning each day properly avoids disruption and keeps the project moving smoothly.
For larger projects, installation is often scheduled room by room across several days, allowing the centre to remain organised throughout the transformation.
The programme becomes the working document that links design, print and physical installation together.


The Final Result: A Space Young People Feel Proud To Walk Into

When the installation is complete, the difference is immediate.
What was once an ordinary wall becomes a visual statement that sets the tone for the whole youth centre. Large-scale graphics do more than decorate a space they create identity, energy and emotional ownership.
The result is a youth centre that feels less like a service and more like a destination.
End With a Community Opening
The final stage should never simply be handing the room back.
A youth centre opening creates pride.
Invite:
local residents
young people
councillors
MPs
community partners
This turns the project into something visible and valued beyond the building itself.
A youth centre should never just look better.
It should change how young people feel inside it.
That is where design starts influencing behaviour.


Comments